CartPage.js 코드 수정
import React, {useEffect, useState} from 'react'
import {useDispatch} from 'react-redux';
import {getCartItems, removeCartItem} from '../../../_actions/user_actions';
import UserCardBlock from './Sections/UserCardBlock';
import {Empty} from 'antd'
import Paypal from '../../utils/Paypal';
function CartPage(props) {
const dispatch = useDispatch();
const [Total, setTotal] = useState(0);
const [ShowTotal, setShowTotal] = useState(false)
useEffect(() => {
let cartItems = []
// 리덕스 user state에서 cart안에 상품이 들어있는지 확인
if(props.user.userData && props.user.userData.cart) {
// 카트 안에 상품이 하나 이상 들어있다면
if(props.user.userData.cart.length > 0){
props.user.userData.cart.forEach(item => {
cartItems.push(item.id)
})
// 밑에 액션에 매개변수로 방금 props로부터 받은 user의 userData에서 cart들을 담은 변수와,
// userData의 cart 정보도 주자. (이때 두번째 매개변수를 넣어주는 이유는 quantity는 user의 cart 부분에만 존재하기 때문)
dispatch(getCartItems(cartItems, props.user.userData.cart))
.then(response => {
calculateTotal(response.payload)
})
}
}
return () => {
}
}, [props.user.userData])
const calculateTotal = (cartDetail) => {
let total = 0;
cartDetail.map(item => {
total += parseInt(item.price) * item.quantity
})
setTotal(total);
setShowTotal(true);
}
let removeFromCart = (productId) => {
dispatch(removeCartItem(productId))
.then(response => {
if(response.payload.productInfo.length <= 0){
setShowTotal(false);
}
else {
calculateTotal(response.payload.productInfo)
}
})
}
return (
<div style={{ width: '85%', margin: '3rem auto'}}>
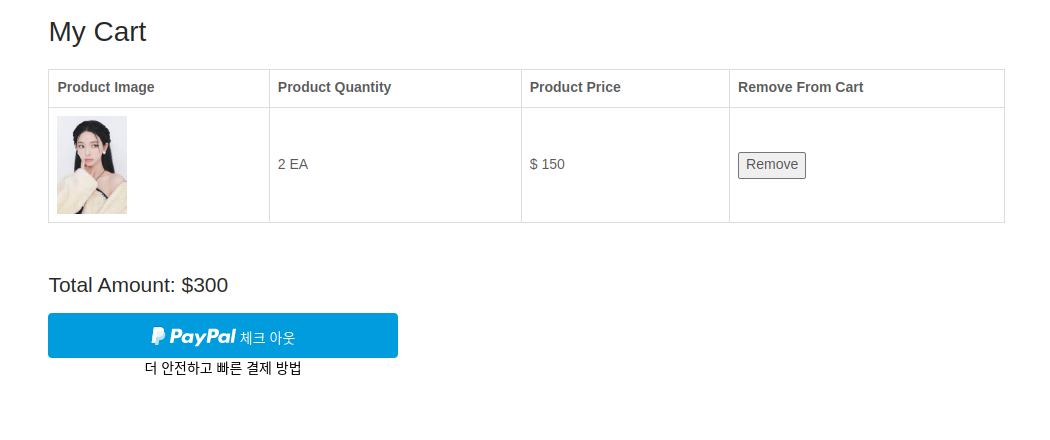
<h1>My Cart</h1>
<div>
<UserCardBlock products={props.user.cartDetail && props.user.cartDetail} removeItem={removeFromCart}/>
</div>
{ShowTotal ?
<div style={{marginTop: '3rem'}}>
<h2>Total Amount: ${Total}</h2>
<Paypal total={Total}/>
</div>
:
<>
<br/>
<Empty description={false}/>
</>
}
</div>
)
}
export default CartPageCartPage.js
상품을 삭제했는데 그때그때 계산된 가격이 업데이트가 안되어서 코드를 좀 수정했다.
Paypal 초기설정
https://developer.paypal.com/dashboard
Developer Dashboard
developer.paypal.com
SandBox Paypal 회원 가입부터 해야한다.
무슨 postal code를 입력하라는데 seoul 같은 경우 대충 99999 입력해주면 포맷에 맞다.
위 사이트에서 sanbox accounts 사이트로 들어가서 create account 버튼을 누른다.
1. 비즈니스 용도가 아니므로 personal로 선택하고 나라는 south korea로 선택하고 create 버튼을 누른다.
2. 강사님께서 하신대로 personal로 해봤는데 paypal 로그인창이 안뜬다. 그래서 personal 말고 business로 만들어주자.
(어차피 accounts라 돈은 빠져나가지 않는다고 하신다.)
첫번째랑 두번째 둘 다 안된다..
후.. 밑에서 나올 Paypal.js에서 client 부분에 sandbox 내용은 AelMA7rUdxce2INjEX1y9KQ47L4J8Idv7rIROe3if2vnMqsIkIz5FFUvA5g-cZiRCnRl3X2EAZljDxWw
이걸로 넣어주자. 강사님이 만드신 accounts인데 이걸로 하면 창이 뜬다. 로그인 창이 떴다면 busindess로 만들어준 accounts 이메일을 넣고 바꿔준 비밀번호를 넣고 로그인하면 된다.
그 다음 default가 아닌 account name의 설정란을 들어간다.
더보기 버튼을 누르면 view/edit account가 뜰 텐데 눌러서 비밀번호를 바꿔준다.
Payment Model 만들기
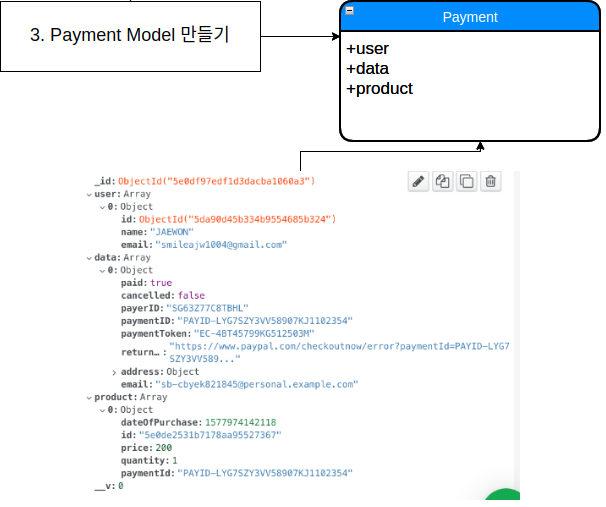
Payment model에는 누가 결제를 했고, 어떤 상품을 결제를 했고, paypal에서 준 정보들을 모델에 넣어 줄 것이다.
server/models 폴더에서 Payment.js 파일을 만들어주자.
const mongoose = require('mongoose');

const paymentSchema = mongoose.Schema({
    user: {
        type: Array,
        default: []
    },
    data: {
        type: Array,
        default: []
    },
    product: {
        type: Array,
        default: []
    }
}, {timestamps: true})


const Payment = mongoose.model('Payment', paymentSchema);

module.exports = { Payment }
server/models/Payment.js
Paypal Button 만들기
라이브러리를 하나 다운받자.
npm install react-paypal-express-checkout --save
paypal 버튼 같은 경우 컴포넌트를 따로 만들어서 보관해주자.
이 버튼은 어떤 사이트에서도 사용가능하기 때문에 utils/Paypal.js 파일을 만들어주자.
https://www.npmjs.com/package/react-paypal-express-checkout
react-paypal-express-checkout
React component that renders Paypal's express check out button. Latest version: 1.0.5, last published: 4 years ago. Start using react-paypal-express-checkout in your project by running `npm i react-paypal-express-checkout`. There are 13 other projects in t
www.npmjs.com
위 사이트의 Full Example를 모두 복사해서 Paypal.js에 붙여넣기 한다.
그리고 class 이름을 MyApp에서 Paypal로 바꿔주고,
해당 컴포넌트를 렌더링해보면 노란색 버튼에 크기가 살짝 작게 나오므로 style을 조금 넣어줬다.
import React from 'react';
import PaypalExpressBtn from 'react-paypal-express-checkout';

export default class Paypal extends React.Component {
    render() {
        const onSuccess = (payment) => {
            // Congratulation, it came here means everything's fine!
            		console.log("The payment was succeeded!", payment);
            		// You can bind the "payment" object's value to your state or props or whatever here, please see below for sample returned data
        }

        const onCancel = (data) => {
            // User pressed "cancel" or close Paypal's popup!
            console.log('The payment was cancelled!', data);
            // You can bind the "data" object's value to your state or props or whatever here, please see below for sample returned data
        }

        const onError = (err) => {
            // The main Paypal's script cannot be loaded or somethings block the loading of that script!
            console.log("Error!", err);
            // Because the Paypal's main script is loaded asynchronously from "https://www.paypalobjects.com/api/checkout.js"
            // => sometimes it may take about 0.5 second for everything to get set, or for the button to appear
        }

        let env = 'sandbox'; // you can set here to 'production' for production
        let currency = 'USD'; // or you can set this value from your props or state
        let total = 1; // same as above, this is the total amount (based on currency) to be paid by using Paypal express checkout
        // Document on Paypal's currency code: https://developer.paypal.com/docs/classic/api/currency_codes/

        const client = {
            sandbox:    'YOUR-SANDBOX-APP-ID',
            production: 'YOUR-PRODUCTION-APP-ID',
        }
        // In order to get production's app-ID, you will have to send your app to Paypal for approval first
        // For sandbox app-ID (after logging into your developer account, please locate the "REST API apps" section, click "Create App"):
        //   => https://developer.paypal.com/docs/classic/lifecycle/sb_credentials/
        // For production app-ID:
        //   => https://developer.paypal.com/docs/classic/lifecycle/goingLive/

        // NB. You can also have many Paypal express checkout buttons on page, just pass in the correct amount and they will work!
        return (
            <PaypalExpressBtn
                env={env}
                client={client}
                currency={currency}
                total={total}
                onError={onError}
                onSuccess={onSuccess}
                onCancel={onCancel}
                style={{size:'large', color:'blue', shape:'rect', label:'checkout'}}
                />
        );
    }
}
Paypal.js
import Paypal from '../../utils/Paypal';만들어준 Paypal 컴포넌트를 CartPage.js에 갖고와서
  return (
    <div style={{ width: '85%', margin: '3rem auto'}}>
      <h1>My Cart</h1>
      <div>
        <UserCardBlock products={props.user.cartDetail && props.user.cartDetail} removeItem={removeFromCart}/>
      </div>

      {ShowTotal ?
        <div style={{marginTop: '3rem'}}>
          <h2>Total Amount: ${Total}</h2>
          <Paypal />
        </div>
      :
        <>
          <br/>
          <Empty description={false}/>
        </>
      }
    </div>
  )
CartPage.js에서 밑에 부분
Paypal로 결제하기
현재 상태에서 Paypal 버튼을 누르면 에러가 날 것이다.
이것을 해결하기 위해 앞으로 나오는 과정을 처리해주자.
https://developer.paypal.com/dashboard/
Developer Dashboard
developer.paypal.com
다시 이 사이트로 들어가면 메뉴란에 Apps & Credentials 라는 메뉴가 있다. 여기에 들어가자.
그리고 Create App을 눌러주는데, App Type은 Merchant고 App Name은 아무거나 지어도 좋다. 그리고 Sanbox Business Account 같은 경우 default가 아니면서 비밀번호를 바꿔줬었던 것으로 넣어줘야한다.
여기까지 하면 Client ID가 나온다.
이것을 복사해서 Paypal.js 코드를 보면 client 객체가 선언된 부분이 있는데 이 부분의 sanbox 필드에 넣어준다.
위에서 설명한 대로 넣고 로그인 한다.
그리고 결제창이 뜨면 오른쪽 상단에 1.00 으로 가격이 들어가있는데
이것은 Paypal.js 파일의 total 변수 값이다. 이 변수의 값을 바꿔주기 위해 CartPage.js에서 자식 컴포넌트인 Paypal.js에 props로 모든 상품을 계산한 총 가격 state인 Total을 보내주자. 그리고 받은 props를 total 변수에 넣어준다.
import React from 'react';
import PaypalExpressBtn from 'react-paypal-express-checkout';

export default class Paypal extends React.Component {
    render() {
        const onSuccess = (payment) => {
            // Congratulation, it came here means everything's fine!
            		console.log("The payment was succeeded!", payment);
            		// You can bind the "payment" object's value to your state or props or whatever here, please see below for sample returned data
        }

        const onCancel = (data) => {
            // User pressed "cancel" or close Paypal's popup!
            console.log('The payment was cancelled!', data);
            // You can bind the "data" object's value to your state or props or whatever here, please see below for sample returned data
        }

        const onError = (err) => {
            // The main Paypal's script cannot be loaded or somethings block the loading of that script!
            console.log("Error!", err);
            // Because the Paypal's main script is loaded asynchronously from "https://www.paypalobjects.com/api/checkout.js"
            // => sometimes it may take about 0.5 second for everything to get set, or for the button to appear
        }

        let env = 'sandbox'; // you can set here to 'production' for production
        let currency = 'USD'; // or you can set this value from your props or state
        let total = this.props.total; // same as above, this is the total amount (based on currency) to be paid by using Paypal express checkout
        // Document on Paypal's currency code: https://developer.paypal.com/docs/classic/api/currency_codes/

        const client = {
            // sandbox: 'AdrH2GwWzzIVcCe-V4-YiNcnqhRWdfWJ-RssTjL9RsRQ5DaOiudrQcQpNR8tI8ofG4o9GPkts7ZJMrOu',
             // sandbox: 'ATG7xJ_MC0b86TpvnYsp7-Ao9en5oPlktZF42bxi_GR7O4T0FmN0qfqR6d-QFtYR4J_dbbUDrhAe2aNi',
            sandbox:    'AelMA7rUdxce2INjEX1y9KQ47L4J8Idv7rIROe3if2vnMqsIkIz5FFUvA5g-cZiRCnRl3X2EAZljDxWw',
            production: 'YOUR-PRODUCTION-APP-ID',
        }
        // In order to get production's app-ID, you will have to send your app to Paypal for approval first
        // For sandbox app-ID (after logging into your developer account, please locate the "REST API apps" section, click "Create App"):
        //   => https://developer.paypal.com/docs/classic/lifecycle/sb_credentials/
        // For production app-ID:
        //   => https://developer.paypal.com/docs/classic/lifecycle/goingLive/

        // NB. You can also have many Paypal express checkout buttons on page, just pass in the correct amount and they will work!
        return (
            <PaypalExpressBtn
                env={env}
                client={client}
                currency={currency}
                total={total}
                onError={onError}
                onSuccess={onSuccess}
                onCancel={onCancel}
                style={{size:'large', color:'blue', shape:'rect', label:'checkout'}}
                />
        );
    }
}
Paypal.js
'react-shop-web > front & back' 카테고리의 다른 글
| 결제 내역 페이지 만들기 (0) | 2023.02.22 |
|---|---|
| Paypal로 결제 성공 후 할 일들 (0) | 2023.02.22 |
| 카트에 들어있는 상품들 가격 계산 & 카트에 들어있는 상품 지우기 (0) | 2023.02.14 |
| 카트에 담긴 상품 정보 가져오는 부분 코드 수정 (0) | 2023.02.13 |
| 데이터베이스에서 가져온 상품 정보들을 화면에서 보여주기 (0) | 2023.02.13 |