들어가기 전에 CheckBox 컴포넌트랑 RadioBox 컴포넌트에서 Collapse를 이용하는 부분이 있는데 여기서 dafaultActiveKey를 0으로 설정해서 처음 사이트를 들어갔을 때 패널이 접혀있도록 해주고 header도 이름에 맞춰서 바꿔주자.
그리고 카드 컴포넌트를 클릭했을 때 해당 상품의 id에 맞는 상세페이지로 갈 수 있도록 card 컴포넌트의 cover부분에 있는 imageSlider를 a태그로 감싸주자.
    const renderCards = Products.map((product, index) => {
        return (
            <Col lg={6} md={8} xs={24} key={index}>
                <Card
                    cover={<a href={`/product/${product._id}`}><ImageSlider images={product.images} /></a>}>
                    <Meta
                        title={product.title}
                        description={`${product.price}`}
                    />
                </Card>
            </Col>
        )
    })
LandingPage.js에 있는 renderCards 함수 부분이다.
빈 상품 상세 페이지 만들기 & Proudct detail page를 위한 Route 만들기
views 폴더에 DetailProductPage 폴더를 만들어서 안에다가 DetailProductPage.js 파일을 만들어주자.

https://basketdeveloper.tistory.com/51
React에서 match와 props
React에서 match와 props는 별로 연관성이 없습니다. 하지만 변수를 다른 컴포넌트로 넘겨 사용할 때 쓰는 건데, 헷갈릴때가 있더라구요..(나만 그럴수도..ㅎㅎ) match는 route -> component props는 component ->
basketdeveloper.tistory.com
App.js에 와서 라우트 하나 넣어주고 컴포넌트로 위에서 만들었던 DetailProductPage를 임포트 해와서 넣어주자.
상품 상세 페이지는 로그인을 하든 안하든 상관없이 모두가 들어갈 수 있기 때문에 auth는 null로 넣어주자
function App() {
  return (
    <Suspense fallback={(<div>Loading...</div>)}>
      <NavBar />
      <div style={{ paddingTop: '69px', minHeight: 'calc(100vh - 80px)' }}>
        <Switch>
          <Route exact path="/" component={Auth(LandingPage, null)} />
          <Route exact path="/login" component={Auth(LoginPage, false)} />
          <Route exact path="/register" component={Auth(RegisterPage, false)} />
          <Route exact path="/product/upload" component={Auth(UploadProductPage, true)} />
          <Route exact path="/product/:productId" component={Auth(DetailProductPage, null)} />
        </Switch>
      </div>
      <Footer />
    </Suspense>
  );
}
product 정보를 DB에서 가져오기
import axios from 'axios'
import React, { useEffect } from 'react'

function DetailProductPage(props) {

    const productId = props.match.params.productId

    useEffect(() => {

        axios.get(`/api/product/products_by_id?id=${productId}&type=single`)
            .then(response => {
                if(response.data.success){
                  console.log(response.data)
                }else {
                    alert('상세 정보 가져오기를 실패')
                }
            })

    }, [])


  return (
    <div>DetailProductPage</div>
  )
}

export default DetailProductPage
DetailProductPage.js
router.get('/products_by_id', (req, res) => {
    // /api/product/products_by_id?id=${productId}&type=single

    // type은 나중에 쓰이므로 그때가서 설명.
    let type = req.query.type
    let productId = req.query.id

    // productId를 이용해서 DB에서 productId와 같은 상품의 정보를 가져온다.
    Product.find({ _id: productId })
        .populate('writer')
        .exec((err, product) => {
            if (err) return res.status(400).send(err)
            return res.status(200).send({success:true, product})
        })

})
server/routes/product.js 파일에 위 코드를 추가해주자.
전까지는 req.body 이런식으로 접근해서 데이터를 갖고왔었는데
이번엔 url의 query 부분을 이용했으므로 req.query로 접근해서 데이터를 갖고온다.
위 코드들을 추가해주고 나서 실행시켜보자.
상품 상세 페이지에 들어가보면 아래 처럼 콘솔에 찍힌다.
Product detail 페이지 UI 만들기(productInfo, productImage)
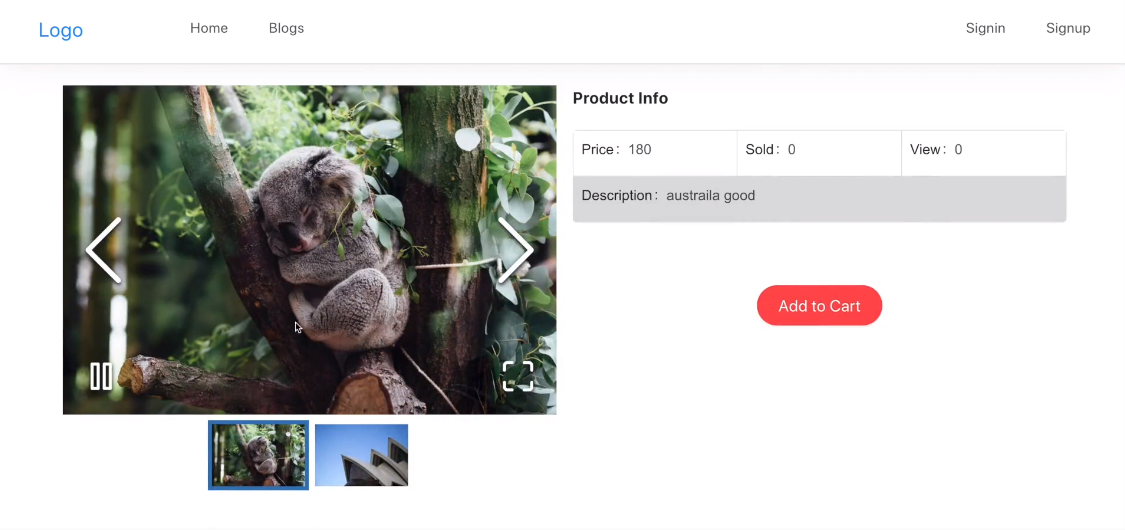
이런식으로 Product detail 페이지를 만들 것이다.
해당 페이지는 왼쪽에는 productImage 컴포넌트, 오른쪽에는 productInfo 컴포넌트가 있다.
productImage 컴포넌트 같은 경우 위 이미지처럼의 형식으로 만들기 위해선 react-image-gallery 라는 라이브러리를 이용해야한다. client 경로로 가서 터미널에 밑에 코드를 입력하자.
npm install react-image-gallery --save
DetailProductPage 폴더에서 Sections 폴더를 만들고 ProductImage.js , ProductInfo.js 컴포넌트를 만들어주자.
import axios from 'axios'
import React, { useEffect, useState } from 'react'
import ProductImage from './Sections/ProductImage'
import ProductInfo from './Sections/ProductInfo'
import {Row, Col} from 'antd'

function DetailProductPage(props) {

    const productId = props.match.params.productId

  const [Product, setProduct] = useState({})

    useEffect(() => {

        axios.get(`/api/product/products_by_id?id=${productId}&type=single`)
            .then(response => {
                if(response.data.success){
                  setProduct(response.data.product[0])
                }else {
                    alert('상세 정보 가져오기를 실패')
                }
            })

    }, [])


  return (
    <div style={{ width: '100%', padding: '3rem 4rem' }}>
      <div style={{display: 'flex', justifyContent: 'center'}}>
        <h1>{Product.title}</h1>
      </div>

      <br />

      <Row gutter={[16,16]}>
        <Col lg={12} sm={24}><ProductImage detail={Product} /></Col>
        <Col lg={12} sm={24}><ProductInfo/></Col>
      </Row>

    </div>
  )
}

export default DetailProductPage
DetailProductPage.js
[ProductImage]
https://www.npmjs.com/package/react-image-gallery
react-image-gallery
React carousel image gallery component with thumbnail and mobile support. Latest version: 1.2.11, last published: 4 months ago. Start using react-image-gallery in your project by running `npm i react-image-gallery`. There are 185 other projects in the npm
www.npmjs.com
import React, { useEffect, useState } from 'react'
import ImageGallery from 'react-image-gallery'

function ProductImage(props) {

    const [Images, setImages] = useState([])

    useEffect(() => {
        if (props.detail.images && props.detail.images.length > 0) {
            let images = []

            props.detail.images.map(item => {
                images.push({
                    // 사이트에서 쓸 땐 밑의 부분들은 다이나믹하게 해줘야함.
                    original: `${process.env.REACT_APP_SERVER}/${item}`,
                    thumbnail: `${process.env.REACT_APP_SERVER}/${item}`
                })
            })

            setImages(images)
        }
    }, [props.detail])

  return (
      <div>
          <ImageGallery items={Images} />
    </div>
  )
}

export default ProductImage
ProductImage.js
위 코드에서 useEffect의 [] 부분에 props.detail이 들어가 있는 것을 볼 수 있다.
이렇게 넣어준다는 것은 props.detail의 값이 변할 때 마다 해당 컴포넌트를 다시 렌더링 하라는 의미이다.
만약에 빈칸에 props.detail이 없다면 컴포넌트가 처음엔 return 부분만 렌더링 해주기 때문에 아무 이미지가 안 뜰 것이다.
즉, 빈칸에 props.detail을 넣어주고 나서 컴포넌트가 처음에 return 부분을 바로 렌더링 해주고, useEffect가 호출되어 props를 통해 props.detail에 값이 들어오게 된다.
이때 props.detail의 값이 바뀌었으므로 images 배열에 props로 받아온 이미지 경로들이 저장되고 Images state까지 다 저장된 후에 해당 컴포넌트를 다시 렌더링 한다. 이렇게 되면 ImageGallery의 items에 저장해두었던 Images state가 들어감으로써 이미지들이 화면에 뜨게 된다.
[ProductInfo]
ProductInfo도 Image때 처럼 props로 detail={Product}를 줘서 Info 컴포넌트에서도 DetailProductPage에서 갖고온 상품 정보를 쓸 수 있도록 해주자.
https://ant.design/components/descriptions
Descriptions - Ant Design
The number of span Description.Item. Span={2} takes up the width of two DescriptionItems. When both style and labelStyle(or contentStyle) configured, both of them will work. And next one will overwrite first when conflict.
ant.design
import React from 'react'
import { Button, Descriptions } from 'antd';

function ProductInfo(props) {

  const clickHandler = () => {

  }

  return (
    <div>
      <Descriptions title="Product Info">
        <Descriptions.Item label="Price">{props.detail.price}</Descriptions.Item>
        <Descriptions.Item label="Sold">{props.detail.sold}</Descriptions.Item>
        <Descriptions.Item label="View">{props.detail.views}</Descriptions.Item>
        <Descriptions.Item label="Description">{props.detail.description}</Descriptions.Item>
      </Descriptions>

      <br />
      <br />
      <br />
      <div style={{display: 'flex', justifyContent:'center'}}>
        <Button size="large" shape="round" type="danger" onClick={clickHandler}>
          Add To Cart
        </Button>
      </div>
    </div>
  )
}

export default ProductInfo
ProductInfo.js
'react-shop-web > front & back' 카테고리의 다른 글
| Add To Cart 기능 개선 및 카트 Tab 만들기 (0) | 2023.02.12 |
|---|---|
| Add To Cart 구현하기 (0) | 2023.02.12 |
| 검색 기능 만들기 (0) | 2023.02.04 |
| 라디오 박스 필터 만들기 (0) | 2023.02.04 |
| 체크 박스 필터 만들기(2) (0) | 2023.01.29 |


